Wowchemy, It's like LaTex but for websites: How to create your academic website like this
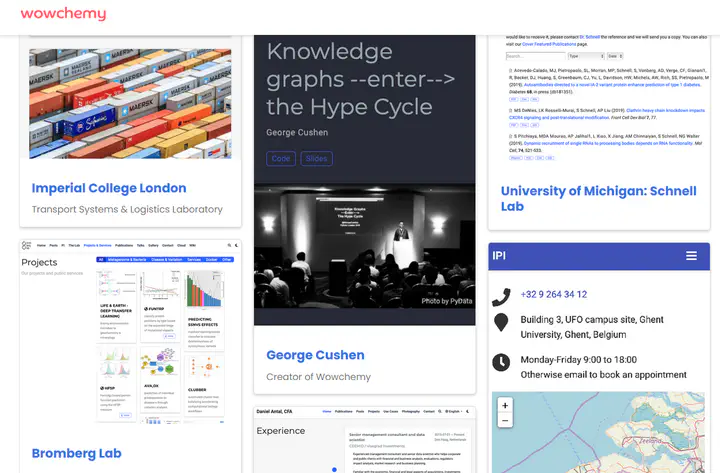 Screenshot captured from https://wowchemy.com/user-stories/ on Jan 31, 2021
Throughout the years I’ve explored different options to support my online presence and dissemination, both as a PhD student and as an independent contractor, as surely most academics, students and freelancers have done too. My last go using Wordpress on a paid hosting provider ended up feeling a bit overkill on one hand, and not adequate for my needs on the other.
One day, while surveying for some papers, I ran into a researcher’s website - unfortunately I didn’t take note of who it was - and I immediately thought Hey this is the kind of page I want! At the bottom I found it was developed using Wowchemy’s Academic template for Hugo, whatever that meant. To clarify, I have no legal, developmental or commercial affiliation with the software - it’s free and open source and I think it’s great so my intention here is to willingly promote it so that others in a similar situation may be inspired to adopt it.
Personal website for academics - Students, Researchers, Labs
I’m sharing this experience because I believe any PhD or even MSc student, and especially any professor, post-doc, or researcher in any position should hold a solid online presence to allow them to build up their own cluster of knowledge that others can easily and unmistakably consult. Besides that, we live in a multi-media connected world and traditional papers sometimes aren’t enough to properly share our research, projects and thoughts. We feel the need to start publishing and disseminating packs containining a paper, a video, maybe a tutorial, a piece of code or even an interactive web demo. The solution I found involves some coding, so I can’t say it’s as easy as drag-and-dropping widgets using Wordpress or similar, but it’s definitely acessible for anyone who’s learned to code in LaTeX - as is the case of most academics - in any field, even with no other programming knowledge or experience.
Wowchemy was created by George Cushen and aims exactly at providing academic-directed webpage layouts and widgets - not only for individuals but also for insitutions and labs.
It provides you with sections/layouts and widgets to set up your website with various elements such as (but not limited to) Biography, Experience, Publications, Projects, Posts/Journal, Tutorials, Course/Books, or Slides.
Wowchemy Workflow
If you’ve created a website before, you might be familiar with a CMS (content management system) called Wordpress, which provides you with a click-through-drag-n-drop GUI to manage your content. In this case the CMS is Wowchemy.
What you do need and want to know is that instead of that drag-n-drop but sometimes somewhat limtied GUI of Wordpress, you edit your content as Markdown code.
If you don’t know what it is, you’ll find it to work a bit like a simpler form of LaTeX, aimed at the web.
Wowchemy is actually a module for Hugo, which works as a sort of LaTeX system for webpages - you edit your content with a certain syntax to specify formatting, figures, links, etc, and then the Hugo system will build it into a webpage instead of a PDF.
You don’t really need to know much about Hugo to use it though, unless you want to modify or create your own widgets (i.e. in LaTeX that would be similar to creating a new template)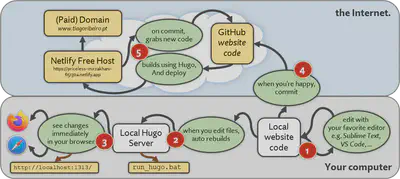
Ok that seems complicated - don’t worry - I gave it a shot and found out there’s a free service called Netlify where you can register your website and connect it to your GitHub account - which will hold your content sources (e.g. the .tex files if it were LaTeX). Netlify will take care of all that trouble automatically so you can concentrate on your website’s appearance, layout and content.
Below you can see the .md file (Markdown) for this post in VSCode to give you a better idea of what it looks like.
Feel free to zoom into it.
The sections of your website are automatically created from the files and folders you add - to create a new post or a new project, I just need to copy an existing one and then change its contents.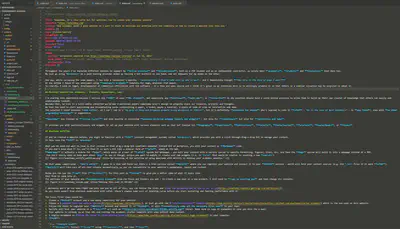
I obviously won’t go too deep right now onto how you do all of this, you can follow the links and read the documentation on how to set it up. As you could expect from previous experience with LaTeX, there’s always some sort of learning curve before you start mastering and feeling confortable with it.
The basic first steps would be:
Create a GitHub account and a new empty repository for your website.
Choose a template from the various options, or just go with the started-Academic template which is the one used on this website.
Follow the steps to register your Netlify account and connect it to GitHub. It will automatically copy all the necessary files over to your repo.
Netlify will host your website at a wierd url such as https://priceless-mirzakhani-65130a.netlify.app (mine). Make sure to copy it somewhere in case you miss the e-mail.
Your website is already up at that URL and running the academic-starter template with some default demo content.
I highly recommend to follow the steps to allow editing locally in your computer.
TLDR:
7.1. Install stuff
- Windows: Install Scoop using Powershell, and then Hugo:
Set-ExecutionPolicy -ExecutionPolicy RemoteSigned -Scope CurrentUseriwr -useb get.scoop.sh | iexscoop install git go hugo-extended- Mac: Install Homebrew and then Hugo
/bin/bash -c "$(curl -fsSL https://raw.githubusercontent.com/Homebrew/install/master/install.sh)"brew update && brew upgradebrew install git golang hugoadd to
~/.zshrc(or~/.bashrc):export PATH=$PATH:/usr/local/go/bin- Linux: Check the link I provided above to download and install your package.
.7.2 Clone your code
You can use e.g. GitHub Desktop or any other Git client to clone the code from your repository into a local folder on your computer.
.7.3 Run the Hugo server locally
Browse to the folder there you cloned your repo.
Launch a command-line or terminal in that folder and start the Hugo server by running:
hugo serverYou can also create a
.bator.shfile later to make a double-click-launcher..7.4 Try your website in your browser
Launch the address http://localhost:1313/ in your favorite browser
.7.5 Edit your files and see the changes in your browser
Use a nice text or code editor such as Sublime Text or VS Code to edit files
You can start by editing your website title and play with some more settings on the
.config\_default\config.tomlfile.Once you make a change and save your file, Hugo will automatically update it in your browser - you don’t even have to refresh it.
Ok, honestly sometimes it breaks or doesn’t update correctly - depending on the changes you’re making.
If that’s the case just terminate the Hugo server and launch it again :)
Tiago Ribeiro
Chief Technology Officer (CTO) @ DHTA
Eclectic scientist and engineer striving to breathe the Illusion of Life into autonomous characters